Saturday, July 28, 2012

Visit to Woodchuckville

J and I have rented a cottage on Waneta Lake, a teensy-tiny lake in the Fingerlakes region. This really is the land that time forgot. For most of the week we have done absolutely nothing but cook out and eat, read books, and play Farkle. There is also a lot of just staring at the lake. This has been heavenly!

So today, we decided to shake the dust off and go out for a bit. Our destination was The Windmill Farm & Craft Market in Penn Yan, aka Woodchuckville. If you ever wondered where people get tee shirts that say things like, "I'm Great in Bed (I can sleep for hours at a time)" it's at the Windmill.

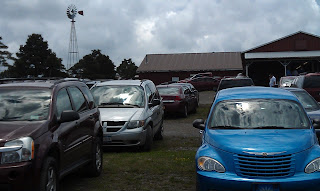
The parking lot, with a view of the namesake windmill
Slightly burned on the edges = perfect!
The Penn Yan area is home to many Mennonites, so they are represented at the Windmill, mostly in the food stands it seemed to me. I was able to buy a loaf of salt-rising bread, a hard to find favorite. My dad used to make it frequently when I was growing up. Salt-rising bread is made without yeast, but instead is made from a starter of naturally occurring micro-organisms, like sour dough. Despite it's name, it isn't salty. I'm not really sure where the salt comes in. Dad had a started made from potatoes, and it stunk to high heaven. Which explains why the cleaning lady threw it out when she was cleaning the fridge one week. A tragedy for us.

So tomorrow I will have some lovely salt-rising bread toasted.  Ah, if only I had some peanut butter to put on it too!

Friday, July 27, 2012

Dygert Does HDR

I'm just fascinated by the HDR photos I've seen -- My nephew Tim took some at the beach in Hawaii that were stunning -- but I've not tried to shoot any on my own until now. With a week at a cottage before me, I thought I might have enough time to noodle through how to do it.

Setting up my Canon DSLR was the hardest part. Lucky for me, I was able to find an excellent resource on the internet. If you have a Canon 5D Mark II, you will be able to use these instructions too. They are very specific!

So once I got the pictures in my camera, then I had to get them put together via Photomatix software. This software has only one purpose -- to combine the bracketed shots in your camera to make an awesome HDR photo. Photomatix isn't expensive, and the version I bought was actually good for 2 people, so I could share it with J too. Also search around on the internet for a % off coupon. At this writing you can get 15% off the list price with an easy to find coupon.

J and I do a calendar every year, primarily for our own pleasure, and share it with family. This year I think the theme is going to be "pictures that tell a story." I think these HDR photos do just that!

Now on to learning about those filters I bought for my camera!

Tuesday, July 24, 2012

Cheese Tasting Lunch!


Although my readers probably will find this nearly impossible to believe, I don’t usually put much focus on my lunch. Right now, since I am trying to loose some weight, lunch is two Adkins bars. Definitely blah. And J doesn’t do anything special for lunch either, making a meal out of whatever is leftover in the fridge.

So, for our vacation, I wanted to really do nice lunches. Here at Waneta Lake we are far from any interesting restaurants. I think we would have to drive all the way to Ithaca for a good meal. So I planned to eat all our meals here. This does make it possible for us to be budget-minded and nutrition-minded as well. So it’s all good.

Today’s lunch was a cheese platter. I bought five nice cheeses at Wegman’s. These were served with a multi-grain baguette, and a sour dough cherry nut bread. Here’s the line up with our remarks. I start describing the one with the piece missing.

1.     Chermont (Vermont).  This lovely double cream made with goat’s milk was wonderful. We had it last night on toasted rounds of the multigrain baguette, and beets tossed with a little vinaigrette and toasted pecans. We loved the richness and the light goaty-ness of this cheese, and both scored it as our top pick of the platter.

2.    Tarentaise (Vermont). This is described on the label as a alpine-style cows milk cheese. It is a hard cheese, with a medium-sharp cheddar flavor that develops in the mouth. It had a little grittiness to me, something I notice in some swiss cheeses with rinds. I don’t especially love it.  I rated it 4th, but J gave it a 3rd.

   
3.     Langa Castelbelbo (Italy). This cheese was semi-soft, kind of the texture of those Laughing Cow wedges you can get. Almost rubbery. The flavor was very non-descript, just light dairy, nothing more. Maybe it would be good cooked in something? I rated it 5th. J rated it 2nd, mostly because she liked the texture.
4.     Aged Mohon (Spain). This was a hard cheese, with a texture J described as flakey. It has a ceddary flavor that we both liked. I rated it 3rd, while J, who will put any creamy cheese before a hard cheese, rated it 4th.
5.     Jumi Apenberger (Switzerland). This was an amazing  hard cheese, creamy with a strong poopie flavor that ended on a floral note. It kind of tasted like dead things smell. But in a good way, really. I rated this 2nd, but J was not impressed. She gave it a 5th.

We ended our meal with some fresh cherries, which were exactly the right thing. With the early spring and then the freeze, and now the drought, we are feeling very blessed to have cherries this summer.

Tomorrow: Melon and prosciutto!
Monday, July 16, 2012

Cookies for Retreat: A Quick Visit to Dewachen!

Ontul Rinpoche
We had a wonderful time this weekend at our Buddhist center, the Amitabha Foundation in Rochester, NY. Ontul Rinpoche, a skillful teacher and inspiring yogi, was invited by our founder Ayang Rinpoche to teach  on several topics, including Bodhicitta (Loving Kindness and Compassion) and Lojong, a Tibetan mind-training tradition. Ontul Rinpoche brought his son, Ratna Rinpoche along. It was wonderful to see Ontul Rinpoche again and meet Ratna Rinpoche.

Buddha Amitabha, for whom our center is named, has a pure land called Dewachen, the land of great bliss. There all the conditions are perfect for enlightenment. We strive to give our retreatants an experience that mirrors that. So we do a lot of little things to that end, including serving yummy snacks!

I made some cookies for retreat, and they were very well received by everyone, including Ginger Cookies that I make all the time. You can find the recipe here.

Here are the other (much requested) recipes!

This first recipe is from the site Two Peas and Their Pod. The original recipe says it makes only 16 cookie bars. Believe me, if you ate one that big, you would probably go into a coma! This are rich rich rich! I cut them in to about 36 bares and that was plenty big! Also, the recipe says there is a 15 minute prep time. It took me at least that long to unwrap the darned carmels! I think the prep time was at least double that. But the cookies are worth it, I promise you.
You can find the original recipe here.

Chocolate Chip Salted Caramel Cookie Bars


Yield: 16 cookie bars
Prep Time: 15 minutes
Cook Time: 30 minutes
Total Time: 45 minutes
Chocolate chip cookie bars with a layer of salted caramel. These gooey sweet and salty cookie bars are pretty much perfection!

Ingredients:

  • 2 1/8 cups all-purpose flour
  • 1/2 teaspoon salt
  • 1/2 teaspoon baking soda
  • 12 tablespoons butter, melted and cooled to room temperature
  • 1 cup light brown sugar
  • 1/2 cup granulated sugar
  • 1 large egg
  • 1 large egg yolk
  • 2 teaspoons vanilla extract
  • 2 cups chocolate chips
  • 10 ounces caramel candy squares, unwrapped
  • 3 tablespoons heavy cream
  • Sea salt, for sprinkling over caramel and bars

Directions:

  1. Preheat oven to 325 degrees F. Spray a 2-quart baking pan (which is an 11 X 7 pan-I used a glass Pyrex dish) with nonstick cooking spray and set aside.
  2. In a medium bowl, whisk together flour, salt, and baking soda. Set aside.
  3. In the bowl of a stand mixer, mix the melted butter and sugars together until combined. Add the egg, egg yolk, and vanilla extract and mix until smooth. Slowly add the dry ingredients and mix on low, just until combined. Stir in the chocolate chips.
  4. In a large microwave safe bowl, combine the caramels and heavy cream. Microwave caramels on High until caramels are melted, stirring every 20 seconds. This will take about 2 minutes, depending on your microwave.
  5. Divide the cookie dough in half. Press half of the cookie dough into the prepared pan, smoothing the top with the spatula. Pour hot caramel over the cookie dough. Sprinkle caramel with sea salt. Drop spoonfuls of cookie dough over the caramel and spread dough with a spatula until the caramel is covered. Sprinkle the bars with additional sea salt.
  6. Bake cookie bars for 30 minutes or until the top of the bars are light golden brown and the edges start to pull away from the pan. Cool bars on a wire rack to room temperature. Cut bars into squares and serve.
 **************************
This second recipe comes from Cooking Light and can be found here. I added pecans to the recipe. I think just about everything is better with nuts!

Chewy Chocolate-Cherry Cookies

Ingredients:

  • 1 cup all-purpose flour (about 4 1/2 ounces)
  • 1/3 cup unsweetened cocoa
  • 1/2 teaspoon baking powder
  • 1/4 teaspoon baking soda
  • 1/4 teaspoon salt
  • 1 cup sugar
  • 1/3 cup butter, softened
  • 1 teaspoon vanilla extract
  • 1 large egg 
  • 2/3 cup dried tart cherries
  • 3 tablespoons semisweet chocolate chips
  • Cooking spray

Directions:

  1. Preheat oven to 350°.
  2. Lightly spoon flour into a dry measuring cup; level with a knife. Combine flour, cocoa, baking powder, baking soda, and salt, stirring with a whisk. Place sugar and butter in a large bowl; beat with a mixer at high speed until well blended. Add vanilla and egg; beat well. With mixer on low speed, gradually add flour mixture. Beat just until combined. Fold in cherries and chocolate chips.
  3. Drop by tablespoonfuls 2 inches apart onto baking sheets coated with cooking spray. Bake at 350° for 12 minutes or just until set. Remove from oven; cool on pans 5 minutes. Remove from pans; cool completely on wire racks.
 *****************************
I wanted another non-chocolate cookie to offer our guests, and as I said earlier, I love all things nutty. So I decide a  peanut butter style cookie made with almond butter would be just the thing. It was harder than you can imagine to find such a recipe. But I did finally find this one. Everyone raved about these cookies. I didn't put the almonds on top, only because I forgot.

You can find the original recipe here.

Eastern European Almond Butter Cookie Recipes


Ingredients:

  • 2 cups all-purpose flour
  • 1 teaspoon baking soda
  • 1/2 teaspoon baking powder
  • 1/4 teaspoon salt
  • 3/4 cup (1 1/2 sticks) softened butter
  • 3/4 cup cold almond butter
  • 3/4 cup sugar
  • 3/4 cup packed brown sugar
  • 2 large eggs
  • 1 1/2 teaspoons vanilla
  • 1/2 cup slivered almonds (optional)

Directions:

  1. Heat oven to 375 degrees. In a medium bowl, whisk together flour, baking soda, baking powder and salt. Set aside. 
  2. In a large bowl or stand mixer, beat together butter, almond butter, sugar, and brown sugar until light and fluffy. Add eggs and vanilla and beat until well combined. 
  3. Gradually add flour mixture, mixing well after each addition. If dough is too soft, refrigerate for up to 3 hours. Otherwise, using a 1 1/2-inch cookie scoop, portion out dough on ungreased cookie sheets, spacing at least 1 inch apart. Using the bottom of a floured glass or a glass dipped in sugar, flatten each cookie mound slightly. Top with a few slivered almonds, if desired. 
  4. Bake 10-12 minutes or until golden on top and bottom. Do not overbake. Cool on pan 1 minute, then transfer to a wire rack to cool completely. Store tightly covered.

Friday, July 13, 2012

Garden Report - Peak!


View from the side garden
This has been an extraordinary gardening year, for a couple of reasons. We started early, with an exceptionally mild winter and spring. It has been dry, so even the things that are in the wetest part of the garden, but don't have any business being there are having a good year. And the youngest part of the garden, is three years old now. So things are well-established and ready to be divided.

Beautiful day lilies!
All the day lilies are are blooming now, including my favorites, the spider shaped ones. I think we must have 15 different day lilies represented. Last year I did an arrangement of all the different day lilies in our gardens, and it was an amazing assemblage, if I do say so myself! When Joanne is home again, I think I'll reprise it!
I love the color of this one.

From now on until Fall arrives, we will mostly be pruning and deadheading. I have a couple of echinacea to plant -- red ones! And two cups and saucers, blue of course, too. I'd love to add a garden to the front yard, and another on the side of the house. But I suspect those will be a very hard sell to Miss Joanne, who is much better at stopping to smell the roses than I am.

Tuesday, July 10, 2012

Grilled Salmon, Marinaded in Dijon Mustard

Grilled salmon with grilled squash and rainbow chard
This is absolutely the best best best grilled salmon I have ever made. I think I could eat this 5 days a week, which would probably make my doctor happy and annoy Joanne! I use the wild salmon, not farm raised for this recipe. I've gotten a little suspicious of farm-raised fish. The wild salmon has wonderful color and texture, too.

We can thank Ina Garten for this recipe. I use her marinade, with a small addition of honey, but my directions for cooking the salmon are a little different.

Wild salmon, cut in 6 ounce portions. This amount of marinade will work for 4 servings.
2 tablespoons course dijon mustard
1/2 tablespoon honey
3 tablespoons good soy sauce
6 tablespoons good olive oil
1/2 teaspoon minced garlic

About 30 minutes before you are going to grill, mix the marinade in a pan large enough to accommodate the salmon in a single layer. Put the salmon in the marinade, skin side up.
Make a medium size charcoal fire, and oil the grill so the fish won't stick. When the fire is ready,  place the salmon skin side down on the hot grill.  Discard the marinade the fish was sitting in. Grill for 4 to 5 minutes. Then move the fish away from the heat and cook for another 5 minutes.


Saturday, July 7, 2012

Caponata and Lamb Meat Balls

A perfect summer day for us is one that is spent primarily outdoors, either working in our gardens, or shooting pictures. It definitely isn't a day full of household chores! But girls have to eat, and we like to eat well. So I bite the bullet, and from time to time, make up a bunch of yummy stuff, and then we graze on that for the rest of the week.

And so, recently, I made up some lovely caponata, a cold dish of eggplant, raisens, pine nuts, and capers plus a whole lot more. With some wonderful lamb meatballs, tabouli, hummus, and store-bought nan, we had lunches and dinners for days. And many of theme were taken on the patio, with the flowers and birds as company!

Caponata

This is recipe started with one by Mario Batalia. Don't be put off by the strange additions of coco and cinnamon. I promise you will like it!

2 tablespoons olive oil
1 cup chopped onion
3 stalks celery cut into 1/4" cubes (3/4 cups)
1 medium eggplant diced
6 large green olives, chopped. I like the ones with pimento best, but use whatever you like.
9 good black olives -- the oil cured kind - chopped
1 small roasted red pepper chopped. If you used the green olives with pimento, you could probably skip this.
2 tablespoons capers
1/4 cup pine nuts
1/4 cup golden raisins reconstituted in 1/4 cup water in the microwave for a minute or two
1/4 cup tomato sauce. I use leftover marinara
1/2 teaspoon cocoa powder
1/2 teaspoon cinnamon
1/2 tablespoon honey
1 teaspoon fresh thyme, chopped
1/6 cup balsamic vinegar

Saute the onion, celery, pepper in the olive oil until the onion and celery are soft. Stir in the eggplant and cook for 10 minutes. Add the remaining ingredients and cook for about 15 minutes. Taste and adjust the seasonings, adding more vinegar or honey as needed.


Lamb Meatballs


Suddenly Wegmans has been selling ground lamb. I love this recipe because they are baked. I cook them ahead and then heat them up at supper.

1 pound ground lamb
1/4 cup finely chopped onions
1/2 teaspoon ground cinnamon
1/4 cup chopped parsley
1 teaspoon ground allspice
1 teaspoon salt
1/2 teaspoon black pepper
1/2 cup bread crumbs
1 egg
Preheat oven to 400 F degrees. Mix all the ingredients together in a large bowl, Form the meat into small round meatballs. Place them on a cookie sheet lined with parchment paper, and bake them about 45 minutes.